Key Points
- Build a koi pond in the East Bay by selecting a shaded, level location, digging at least 3 feet deep, and installing a liner, skimmer, and BioFalls filter system.
- Add aquatic plants on shallow shelves and acclimate koi fish gradually to maintain a balanced ecosystem.
- Maintain your pond by feeding koi and cleaning filters and debris regularly.
Make a Splash in Your Backyard Paradise
Ever stare at your backyard and think, “This space could really use something special”?
Or dream of relaxing to the sound of trickling water while colorful koi swim just a few feet away?
In this beginner’s guide, you’ll learn exactly how to build a koi pond in the East Bay—from planning and digging to installing pumps, plants, and fish.
We’ll walk you through every step with clear, simple directions so you feel confident from start to finish.
By the time you’re done reading, you’ll know how to create a peaceful pond construction that looks great and works great, too.
Ready to transform your yard into a living, breathing oasis?
Call California Aqua Pros or fill out the contact form today—we’ll help bring your vision to life.
Understanding Koi Ponds
If you’re learning how to build a koi pond in the East Bay, it’s essential to understand what sets a koi pond apart from a basic backyard water feature.
More than just a decorative addition, a properly designed pond creates a healthy environment for koi fish to thrive.
What Is a Koi Pond?
A koi pond is a purpose-built aquatic space designed to support the health, growth, and beauty of koi fish.
Unlike a basic garden pond, it requires intentional depth, a reliable filtration system, and clean pond water circulation to support fish life long-term.
Key features of a koi pond include:
- A deeper pond (usually at least 3 feet) to protect fish from East Bay temperature swings and predators.
- A proper filtration setup that keeps the water clean by removing waste and encouraging beneficial bacteria. We specialize in installing Aquascape BioFalls biological filters that work with a skimmer and beneficial bacteria to keep water naturally clear.
- A high-quality pond liner, often a flexible pond liner, to hold water securely while shaping your pond.
- Sufficient surface area for gas exchange, which allows oxygen to reach the fish and supports water clarity.
Benefits of a Koi Pond
Whether you’re enhancing your yard in Concord or adding serenity to a backyard in Walnut Creek, a beautiful koi pond offers more than just good looks:
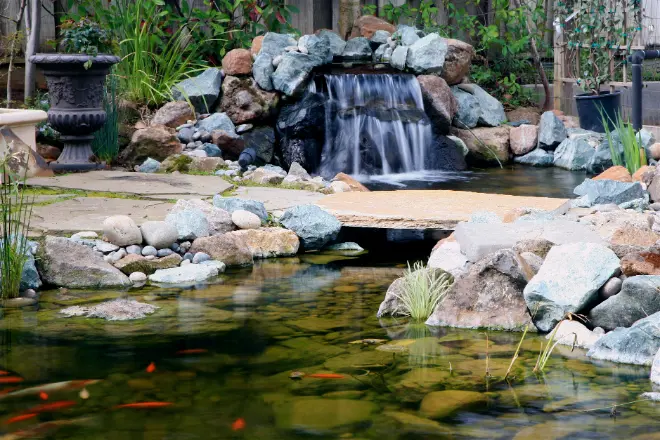
- Aesthetic Enhancement: Adds movement, color, and peaceful water features to your landscape.
- Ecosystem Support: Attracts dragonflies, frogs, butterflies, birds, and helps balance your outdoor fish population.
- Personal Enjoyment: Caring for koi fish and aquatic plants can become a calming, year-round hobby.
By understanding the unique needs of koi and their environment, you’ll set yourself up for success before you ever dig that first hole or unroll your liner.
Let’s move on to the tools and materials you’ll need to get started.
Tools and Materials
Before you start digging, make sure you’ve got everything lined up.
Building a koi pond in your backyard takes more than just enthusiasm—it takes the right tools, durable materials, and a good plan.
Here’s what East Bay homeowners should have on hand.
Tools
These tools will make your project smoother and safer:
- Shovel: For excavation and shaping the pond.
- Pickaxe and Jackhammers: Helps break through tough East Bay clay and rocks.
- Wheelbarrow: Move rocks, gravel, and soil with ease.
- Level: Keeps shelves and pond edges even for proper water balance.
- Tape Measure: Measure pond length, width, and depth accurately.
- Utility Knife: Essential for cutting your flexible liner and tubing.
- Garden Hose: Outline your pond shape or fill it once built.
- Spray Paint: Great for marking where to dig or place key features.
- Rubber Mallet: Adjust and position rocks without cracking them.
- Channel Locks:Tighten and secure plumbing connections.
- Screwdrivers: Attach various pond components.
- Wirecutters and Nuts: Connect electrical components.
- Primer and Glue: Install PVC piping and slip fittings.
Materials
The right materials ensure your pond functions well and lasts:
- Flexible Pond Liner: A strong, weather-resistant liner to hold water in place. Here at Cal Aqua Pros, we use a premium 45 mil EPDM (Ethylene Propylene Diene Monomer) liner to ensure long-term durability.
- *See below for a quick overview of different pond liner materials and why EDPM is the best option for East Bay pond owners. (Note: Mils are how liner thicknesses are measured. 1 mil is equal to a thousandth of an inch, so 45 mil is equivalent to .045 inches).
- Underlayment Fabric: Protects the liner from sharp objects underground.
- Pond Pump: Keeps water moving—choose the right pump size for your pond volume.
- Mechanical Skimmer: Collects floating debris like leaves. Follow the link to learn why a skimmer is so important.
- Biological Filter (BioFalls): Breaks down fish waste and improves water clarity.
- Flexible Tubing: Carries water from your pump to the filter or waterfall.
- Hose Clamps: Secure tubing connections and prevent leaks.
- Rocks and Boulders: Frame the pond edges and support a natural look.
- Gravel: Covers the bottom of your pond, supports plants, and nurtures beneficial bacteria.
- Aquatic Plants: Help control algae, provide shade, and improve oxygen levels.
- Dechlorinator: Neutralizes chlorine in tap water before adding koi.
- Pond Foam Sealant: Seals gaps between rocks and directs water flow.
- Fish Food: Choose a high-quality blend designed for koi.
* Below are the 5 main types of pond liner materials available and their qualities:
- EPDM (Ethylene Propylene Diene Monomer) – Strong, flexible, and puncture-resistant, we believe EPDM is the best option for East Bay ponds. We use a 45 mil thick liner to ensure durability.
- HDPE (High-Density Polyethylene) – Strong, but difficult to repair
- PVC (Polyvinyl Chloride) – Budget-friendly but vulnerable to UV (ultraviolet) exposure
- RPE (Reinforced Polyethylene) – Strong, but a lack of flexibility makes it difficult for ponds with lots of contours
- Concrete – Expensive and prone to cracking, especially when done incorrectly
Step-by-Step Construction Guide
Let’s walk through the actual build process step-by-step.
1. Planning and Design
Before you dig a single inch of your yard, take time to plan your koi pond carefully.
East Bay backyards vary widely, and where you place your pond will directly impact its water quality, fish health, and long-term maintenance.
- Pick the right spot: Ideally, you should choose a level area with partial shade to reduce water temperature spikes and help control algae growth. A professional pond builder can help you integrate your water feature into more complex landscapes.
- Check for underground utilities: Always call before you dig to avoid pipes or cables.
- Determine your planned depth: For a healthy koi fish habitat, aim for at least 3 feet of depth to protect against predators and temperature swings.
- Visualize your design: Consider adding a waterfall, plants, and curves to give your pond a more natural shape.
2. Marking the Pond Outline
Once you’ve chosen a location, it’s time to mark out your future backyard koi pond.
- Use a garden hose to lay out the general shape and flow of the pond.
- For sharper edges or more precise measurements, grab some spray paint and outline your design directly on the ground.
- Think in layers: include shallow shelf areas for plants, and a deeper zone for your koi to gather and rest.
3. Excavation
With your shape locked in, it’s time to break ground and bring your design to life.
- Dig your hole in stages, starting with the outer shape and working your way down to deeper zones.
- Include shelves at multiple levels (e.g., 6″, 12″, and 24–36″) to support aquatic plants and give your koi fish space to swim at different depths.
- Keep sides slightly sloped to prevent soil collapse and allow smooth water flow.
- Save your dirt in a wheelbarrow—you’ll use it later to build up edges or berms behind your waterfall.
4. Installing Underlayment and Liner
Your pond liner is what holds the water in place, so don’t rush this step.
- Lay down underlayment fabric first to cushion the liner and protect it from rocks or roots.
- Next, roll out your flexible pond liner, making sure it covers the entire hole with at least 1–2 feet of overlap around the edges. We use a premium EDPM liner, but some pond contractors may use concrete. Follow the link to learn why we are on the liner side of the liner vs. concrete debate.
- Press the liner into corners and creases as you go, smoothing it out with your hands or feet—avoid sharp tools here.
- Let the liner rest in the sun for a bit—it will soften and mold more easily into shape.
5. Positioning Skimmer and BioFalls
Now it’s time to install the heart of your filtration system—the skimmer and BioFalls.
These two components help your koi pond stay clear and balanced year-round in the East Bay climate.
- Skimmer: Place it at the edge of the pond to capture floating debris like leaves before it sinks. This helps reduce sludge and boosts water quality.
- BioFalls: Install on the opposite side of the skimmer. It acts as a biological filter, promoting the growth of beneficial bacteria that break down fish waste and organic matter.
- Tip: For the most natural flow, the waterfall should return water downhill or across from the skimmer.
This setup ensures your backyard koi pond stays cleaner with less effort—ideal for easy maintenance.
6. Adding Rocks and Gravel
To make your pond look natural and function well, you’ll need to add rocks and gravel across various surfaces.
This isn’t just about style—it’s about long-term performance and the health of your fish.
- Rocks: Use large rocks around the edge to anchor your liner and blend your pond into the surrounding garden.
- Gravel: Spread small gravel across the pond bottom and plant shelves. This provides surface area for beneficial bacteria and gives your pond a clean, finished look.
- Safety tip: Avoid sharp stones near the liner—they can cause tears or punctures.
This layer of stone not only keeps things tidy but also supports biological filtration, helping you maintain a healthier aquatic environment.
7. Installing Pump and Plumbing
Your pump moves water through your filters and waterfall, keeping your ecosystem balanced and your pond water well-oxygenated.
Choose a pump that matches your pond’s size and elevation change.
- Place the pump inside the skimmer so it stays hidden and protected.
- Connect tubing from the pump to the BioFalls. Use secure fittings and hose clamps to prevent leaks.
- Check flow: Water should cycle through the entire pond at least once every hour for optimal filtration and oxygen flow.
A good pump setup is what keeps a beautiful koi pond looking fresh and thriving with life.
8. Filling the Pond
With all your components in place, it’s finally time to add water and bring your East Bay backyard pond to life.
- Slowly add water with a garden hose, watching the liner to ensure it molds smoothly into all corners and shelves.
- As it fills, adjust rocks and edges to keep the liner from shifting.
- Use a dechlorinator before introducing koi—this step is critical to protect your new fish from harmful chemicals.
9. Introducing Aquatic Plants
Adding plants to your koi pond isn’t just about beauty—it plays a vital role in supporting water balance, preventing algae growth, and giving your koi places to rest and hide.
- Shallow shelves: Place potted aquatic plants in these areas to help them thrive without being uprooted.
- Floating plants: Species like water lilies and water hyacinths help shade the pond and reduce algae by blocking direct sunlight.
- Oxygenators: Submerged plants such as anacharis increase oxygen levels and reduce excess nutrients that algae feed on.
In East Bay gardens, these plants not only look great but help you maintain cleaner, clearer pond water with less effort.
10. Acclimating and Adding Koi Fish
Your backyard koi pond is almost complete—but before you add your fish, make sure the water is ready and your setup is stable.
- Acclimate slowly: Float the transport bag in the pond for 15–20 minutes to match temperatures.
- Add pond water gradually: Introduce small amounts of pond water into the bag to help your koi fish adjust to the new chemistry.
- Release gently: Once acclimated, let your koi swim out on their own.
Avoid overstocking—aim for fewer fish with room to grow.
A well-balanced pond supports long-term fish health and reduces the load on your filters.
11. Regular Maintenance
To keep your East Bay koi pond looking great and functioning well year-round, consistent care is key.
Regular maintenance helps prevent issues before they start and keeps your koi healthy.
- Feeding: Offer high-quality food once per day (maximum) during warm seasons. While fish food is fine as an occasional treat, we recommend letting your fish feed primarily from naturally occurring food sources in the pond ecosystem. In winter, reduce or stop feeding entirely depending on temperatures.
- Check filters: Clean your skimmer and biological filters routinely to prevent clogging.
- Monitor water: You may want to occasionally test for pH, ammonia, and nitrate if you think there might be imbalances, but it’s a pond myth that that your water must be tested daily.
- Remove debris: You may need to scoop out leaves and excess plant matter to stop it from sinking and turning into sludge.
Following a simple routine keeps your pond clear, your fish thriving, and your backyard pond the highlight of your landscape.
Ready to Bring Your Dream Koi Pond to Life? California Aqua Pros Can Help
You now know exactly how to build a koi pond from scratch—from planning and digging to adding fish and water features that transform your backyard into a peaceful retreat.
With the right tools, plants, and setup, maintaining a beautiful koi pond in the East Bay is more achievable than ever.
If you’d rather skip the shovel and let pros handle the hard work, the pond builders at California Aqua Pros are ready to design and install a custom koi pond that fits your yard, your style, and your goals.
recent comments